
Arthrosis of the knee joint
Gonartrosis:
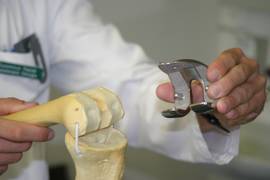
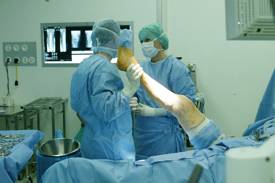
High Tech in the Operating Room
Computer-Navigated Implantation of a Minimally Invasive (MIS) Total Knee Arthoplasty (MIS TKA)
Index:
I. Introduction to knee joint arthrosis (Gonartrosis)
-
1.1 Mechanisms Involved in the Origin of the Gonarthrosis
-
1.2 Complaint Profile of Gonarthrosis
II. Treatment of Gonarthrosis
- 2.1 Conservative Therapy
- 2.2 Operating Therapy
- 2.2.1 Arthroscopic Procedure
- 2.2.2 Valgus and Varus Adjustment Osteotomy
- 2.2.3 Knee Joint Arthroplasty
- 2.2.3.1 Introduction
- 2.2.3.2 How Successful Is this Treatment?
- 2.2.3.3 High Tech in the Operating Room – Computer-Aided Navigation
- 2.2.3.4 Some of the Instruments for the Computer-Navigated Implantation of a Total Knee Arthroplasty TKA with the Stryker-Leibinger System
- 2.2.3.5 Implantation of a Total Knee Arthroplasty with the Stryker-Leibinger System
- 2.2.3.6 MIS Computer-Navigated Implantation of a Total Knee Arthroplasty TKA (MIS: Minimally Invasive Surgery)
- 2.2.3.7 Post-Operative Video Recording After MIS Computer-Navigated Total Knee Arthroplasty TKA (MIS TKA)
- 2.2.3.7.1 Details after MIS Computer Navigated Total Knee Arthroplasty TKA (MIS TKA)
-
2.2.3.8 X-ray Findings After Implantation of MIS Computer-Navigated Total Knee Arthroplasty TKA
-
2.2.3.9 MIS Computer-Navigated Implantation of a Unicompartment Knee Prosthesis (So-Called Partial Knee Prosthesis)
-
2.2.3.11 Information on Physical Therapy for Patients After MIS Computer-Navigated Total Knee Arthroplasty TKA (MIS TKA)
I. Introduction to knee joint arthrosis (Gonartrosis)
Arthrosis has been taking on ever greater importance among orthopedic diseases; it is developing into what might be called a type of national ailment. Arthrosis is a disease of the joint cartilage, which functions as a sliding layer on the bones of the joints of the human body and so provides a friction-free movement of the joint. Through various causes, arthrosis brings about a premature and excessive using up of the joint cartilage.
Basically, an early wearing away of the joint cartilage (= arthrosis) can affect every joint in the human body, but the mechanisms of origin and the possibilities of treatment vary from joint to joint. In this informational brochure, diagnosis and treatment of knee joint arthrosis (= gonarthrosis) will be described, and in particular a new, computer-aided technology, which is easy on the tissue, will be presented – what is called minimally invasive computer-navigated total knee arthroplasty (MIS KTA).
1.1 Mechanisms Involved in the Origin of the Gonarthrosis
The arthrosis is characterized by excessive and early wearing away of the joint cartilage. The increasingly sparse cartilage sliding layer in the end phase of an arthrosis causes bone to rub on bone in the joint. This in turn leads to inflammations and strong pains in the affected joint.
There are various factors that further the development of a gonarthrosis. The general causes of a degenerative joint disease (arthrosis) include hereditary weakness of the joint cartilage (primary arthrosis), metabolic disturbances, incorrect load bearing, trauma, inflammations, and age-related processes. It is important to note in this regard that normal aging of a joint is also caused by degenerative processes, but they do not lead to actual arthroses.
Despite wear and tear due to old age, a normal joint is functional, and arthrosis in no case is a normal, unavoidable phenomenon of old age. Demands put on the joint by sports, hard work, etc. are physiological, that is, the joint can cope well with demands; until old age healthy joints can bear these without damage. As a rule, arthroses arise on the basis of pre-existing joint damage, both congenital and acquired, in particular damage to the cartilage. The cartilage can no longer cope with normal mechanical demands, and is finally destroyed by purely mechanical wear and tear.
There are various factors in the knee joint that promote the development of a knee joint arthrosis (gonarthrosis), so-called pre-arthroses. Incorrect axial positions are of great significance. In a marked incorrect positioning of the leg axis, a one-sided load on the knee joint results. Here, all the forces work principally on one part of the knee (in bow legs on the inner, medial part of the joint, in knock knees on the outer, lateral part); the forces are not equally distributed on the knee surface.
A long-term, one-sided excess load on the knee joint surface leads to using up the cartilage in this area. This is also known as valgus arthrosis (in knock knees) or varus gonarthrosis (in bow legs). An example will clarify the importance of equal distribution of pressure on the joint: Stiletto-heeled shoes with their pointed heels concentrate the entire weight of the human body on a very small area (so-called point pressure), in contrast to shoes with a flat sole, which distribute the weight.
Following a fracture of the upper or lower leg that reaches as far as the joint area, the cartilage may also be damaged. After a healed fracture, a fault may remain in the joint. Both may result in an unevenness in the joint surface, which then encourages the formation of a gonarthrosis under daily load bearing. In the same way, chronic instability in the knee joint caused by a rupture of one of the cruciate ligaments, the lateral ligaments, or damage to the meniscus or several structures at the same time may be predisposing to the development of a gonarthrosis.
Arthrosis of the knee joint can also occur in hemophilic arthropathy (accumulated blood in the joint resulting from a genetically determined deficit in blood clotting factors), in Ahlbaeck disease (aseptic osteonecrosis of the medial femur condyle), or in the inadequate healing of an osteochondrosis dissecans. Mechanical factors are important in all these injuries and diseases. A gonarthrosis can also arise from an inflammatory event, in which the joint cartilage is virtually dissolved by processes furthered by the infection.
1.2 Complaint Profile of Gonarthrosis
Prior knee joint injuries and slowly starting chronic pains point to a developing arthrosis. Typical of this is what is called a warm-up pain, something that improves after a short warm-up phase of the muscles and ligaments, and a fatigue pain, which occurs after longer lasting stress on the knee. During the further course of the disease, the patient notices pains even at rest.
Likewise, as the disease advances, there are repeating effusions in the knee joint, difficulties in completely bending or stretching the knee, and in overheating of the knee joint. As a rule, the knee joint capsule gets somewhat thicker as a sign of an inflamed reaction. In arthroses affecting only one part of the joint (for example, in varus or valgus gonarthrosis or in the Ahlbaeck disease), the incorrect axial position of both extremities is remarkable. The course of the disease is variable, though it is slowly and constantly progressive.
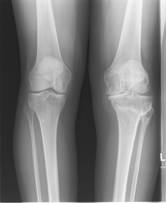
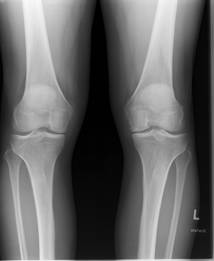
Changes in the joint appear on the X-ray image too. The first visible radiological sign of a gonarthrosis is a narrowing of the joint area because of the missing joint cartilage. As the disease progresses, so-called jagged edges appear, as does a thickening of the bone near the cartilage. These signs are to be interpreted as attempts of the body to replace the missing joint cartilage. However, the “repair” cannot be accomplished in the required places. In the end stage of the gonarthrosis, additional bone cysts are visible on the X-ray image, down to a strong deformation of the joint (See illustration 1).
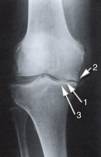
(Illustration 1) Varus gonarthrosis:X-ray image of a knee joint massively changed by the arthrosis in a varus position (so-called bow legs).The following are clearly seen: the joint cavity narrowing on the inner side (1), the bone accumulation on the sides (2), and a thickening of the bone under the joint cavity (3).
II. Treatment of Gonarthrosis
2.1 Conservative Therapy
At the beginning of the disease, physical therapy, exercises, and joint injections with pain-relieving and anti-inflammatory medications may ease the symptoms. If at all possible, protecting the joint by relieving the load with a walking aid should be avoided, but is often forced by the pain.
A knee brace and knee control apparatus may help in stabilizing an unstable knee joint, and thus relieve the pain. However, the goal of conservative therapy can only be pain relief; the progress of the arthrosis cannot be definitely stopped.
2.2 Operating Therapy
2.2.1
Arthroscopic Procedure
Various methods are available, which differ strongly in their starting points. With an early arthrosis, it makes sense to get an exact overview of the definite size of the arthrosis with an arthroscopy (viewing of the knee joint), since even now modern image processes like magnetic resonance imaging (MRI) and computerized tomography (CT) cannot replace the surgeon’s eye.
As part of the diagnostic arthroscopy, it is possible to perform what is called a cleaning of the joint, that is, to remove tissue disturbing the joint, such as a worn meniscus, cartilage flakes, bony deposits, etc., and to “wash out” the joint. During this operation, also damaged joint cartilage can be removed. Old lesions that may lead to knee instability and secondarily to an arthrosis, such as a cruciate ligament rupture or a torn meniscus, may be repaired to halt any possible swift progress of the arthrosis. However, these procedures can only alleviate the symptoms of a gonarthrosis; they are definitely not in a position to recreate the already destroyed joint cartilage.
It is possible however to promote growing a substitute cartilage tissue over damaged cartilage areas or already free-standing bony surfaces. This goal can be achieved through what is called shaving, with bone abrasion, or with so-called microfracturing, or even often with a combination of all three. This method is still disputed, since the developing substitute cartilage is a “lower quality” cartilage, which does not completely withstand the loads in the knee joint.
The aim of this procedure is to be seen rather as gaining time before implantation of a prosthesis. This alternative is especially interesting for younger patients, for whom an endoprosthesis is out not yet indicated on the grounds of age.
2.2.2 Valgus and Varus Adjustment Osteotomy
Patients with an arthrosis in only one joint compartment, due to axial malformation (so-called knock knees, bow legs), may have the leg axis corrected with what is called an adjustment osteotomy. In this procedure, the leg axis is changed by an incision through the bones (depending on the type and shape of arthrosis, the tibia or the femur) so that after the operation the load lies on the healthy side of the knee joint. Thus a slight knock knee situation is created for a situation of bow legs, and the diseased cartilage surface gets a chance to recover (See illustration 2).
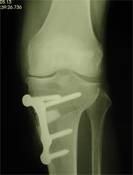
(Illustration 2) Axial correction of a varus malformation (bow legs) with a proximal tibia valgization osteotomy with a Surfix plate. By this operational method, the load bearing of the knee joint on the diseased site (inside of the knee joint) is transferred to the healthy side (outside of the knee joint). The pains recede as a result of this measure, and the further progress of the arthrosis on the diseased side is delayed.
As a result of this operation, the patients can remain almost pain-free for 10 to 15 years and can perform all sports. The implantation of a knee arthroplasty can thus be delayed. The disadvantage is that by putting the load bearing almost exclusively on the “healthy” parts of the knee joint, over time arthrotic changes will occur there as well. As a last resort, the pains of the patient can be treated only with the final replacement of the joint surfaces with a prosthesis.
2.2.3 Knee Joint Arthroplasty
2.2.3.1. Introduction
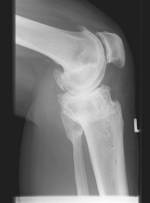
If despite all the previously noted treatment attempts, the gonarthrosis progresses and the patient still suffers from severe pains, there remains only the possibility of a knee joint prosthesis (see illustration 3). The goal is the patient’s freedom from pain in daily life.
Progress in materials research and the constant improvement of operational techniques have in the meantime taken away the terrors present at the beginnings of knee prosthesis. In the meantime, the durability of the knee joint prosthesis has improved so much that a prosthesis can be implanted without problem for up to 20 years.
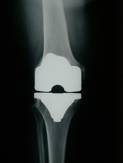
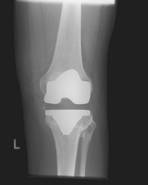
(Illustration 3) Radiological image of the knee joint with a Stryker Scorpio knee prosthesis.
There are actually various types of prostheses, the chief difference among them being the joint surface that is replaced by the prosthesis. There are partial prostheses (so-called unicompartimental knee Prosthesis, sliding prostheses) that replace only the diseased section of the knee joint surface, but at least half. In a total arthroplasty, the entire joint surface is replaced.
Whether or not the rear surface of the kneecap is also replaced depends on this joint section is affected, too. The arthritic joint surface is removed during the operation under full or partial anesthesia, and the bones are prepared for the implantation of the prosthesis. Then the prosthesis is placed on the bone and anchored with a special bone cement.
2.2.3.2 How Successful is this Treatment?
The artificial knee joint today gives excellent results, thanks to new, reliable methods. By replacing the cartilage surfaces with metal or plastic (polyethylene) surfaces, the pain from the load bearing in daily life can usually be reliably removed.
Nothing stands in the way of light, reasonable sports activity (e.g., swimming, bicycling, golf, etc.). Heavier loads, such as contact sports, marathon running, etc. are not advisable because of the danger involved in loosening of the prosthesis and because of the heightened wear and tear on the polyethylene.
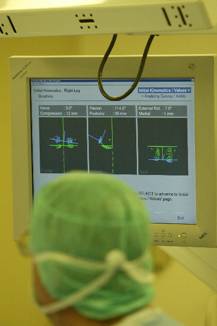
2.2.3.3 High Tech in the Operating Room – Computer-Aided Navigation
Recently medical technology has been able to enjoy the use of very modern techniques in knee endoprosthesis. In particular, the materials used, the operating techniques, and the understanding of the biomechanical processes in the knee joint have made enormous progress.
Technically seen, the success of a knee prosthesis implant depends principally on the correct placement of the components. This is not always simple, even for an experienced operator. As early as the preparation of the bone for the implantation, the correct angle relationships must be considered. The goal is to have normal axial relationships after the operation. In planning the incisions in the bones, so-called computer-aided navigation systems are of assistance (e.g., the Stryker Navigation System). With these, it is possible to display the incisions during the operation, and even more important, to be able to review the result of an incision.
In addition, the axial relationships resulting from the incisions and the twisting of the components with one another can be monitored even during the operation. If the operator, on the basis of his experience, should be dissatisfied with the result of the calculation, the various incisions can be corrected immediately without great additional effort.
Current conventional implantation techniques, those without the use of a computer, use intra- or extra-medullar mechanical aides for orientation in order to achieve the correct alignment of the prosthesis. All these systems, however, have a limited exactness. The reasons for this are, one, that the orientation depends more on the visual perception of the operator than on objective reference points, and, two, the positioning of the incision block is not graded, but possible only in defined distances.
Computer navigation, on the other hand, offers a high degree of exactness (modern navigation systems are highly precise, with deviations of 0.3mm, such as the Stryker Navigation System). As a result of the combination of experience, routine, and the operator’s feel, the installation of the prosthesis in the position best suited to the patient is appreciably easier.
A further advantage of computer aided navigation is that the stability of the ligaments during the operation can be measured over the full range of motion of the knee joint (kinematics). The stability of the ligaments in the knee joint is also of decisive importance for the durability of a knee prosthesis. Instabilities caused by incorrect ligament tension and the resulting uneven loading of the knee run the risk of an early loosening of the prosthesis. The best possible seating of the prosthesis, that is, correctly recreated axial relationships, the best possible rotation of the implant, and exact ligament relationships are therefore essential for a successful knee prosthesis implantation. The smallest deviations therefore mean for the patient possible long-term pains and the resulting incorrect load bearing, premature loosening of the prosthesis, increased expenses in diagnostic and rehabilitation medicine, and finally an early repeat operation. In summary, the computer-aided navigation presents an efficient and economical means of implanting the prosthesis in the best possible position.
An exact placement of the prosthesis avoids pains, extends the life of the prostheses, and last but not least for these reasons results long-term in significant financial savings for the healthcare system.
Above all, however, it should be noted that even though a computer-aided navigation system is a great help, it will never replace an experienced operator.
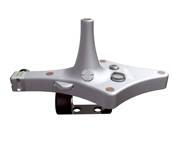
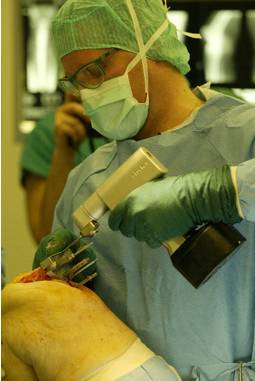
2.2.3.4 Some of the Instruments for the Computer-Navigated Implantation of a Total Knee Arthroplasty TKA with the Stryker-Leibinger System

The navigation tool of the Stryker-Leibinger Company with a camera and an infra-red sensor.
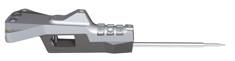
The "pointer":With this tool the operator directs the navigation device from the operating table.
The "tracker": It communicates with the infra-red camera of the navigation system and reports the 3-dimensional position of the leg.
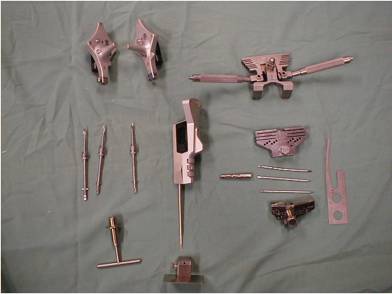
Overview of the some standards Navigation Instruments.
The Stryker-Leibinger navigation instrument: Communication among tracker, pointer, and camera is done by infra-red beams. The device processes all the data with special algorithms and presents them on the screen for the operator.
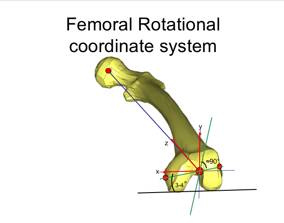
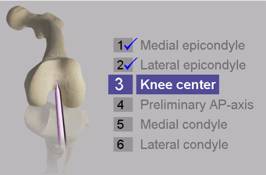
The computer uses an algorithm to calculate the coordinates of the femur and the tibia. Here is an example based on the femur: Three-dimensional representation of the knee joint.
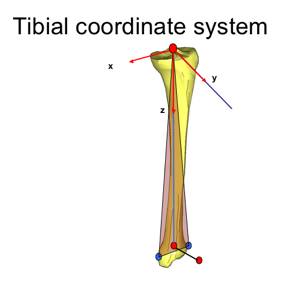
Here is an example based on the tibia.
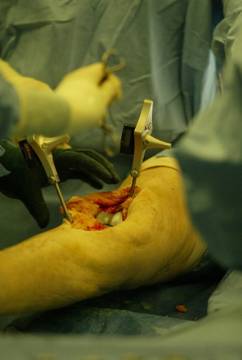
2.2.3.5 Implantation of a Total Knee Arthroplasty with the Stryker-Leibinger System
In the following illustrations, the various steps are discussed for the computer-navigated implantation of a total endoprosthesis of the knee using the Stryker-Leibinger system (cf. illustration 1 and the final result in illustration 3). On grounds of practicability, in the following the term “the patient” will be used for both men and women.
The actual operation is preceded by an extensive discussion with the patient, a clinical and radiological examination, and an exact schedule. In addition, there follow an internal medicine and anesthesiological confirmation, EKG test, X-ray images of the lung, and blood tests. Admission to in-patient status usually occurs on the day before the operation.
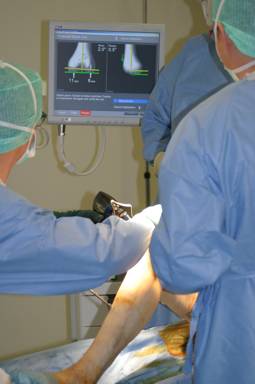
Picture 0:
In the operating room:Preparation of the patient
The patient, according to his choice, receives total anesthesia or partial anesthesia, in which only the legs are anesthetized. Often the patient gets a epidural catheter with which post-operative pains are blocked out. The patient lies on his back on the operating table; the leg is sterilized and covered (photo A).
 A
A 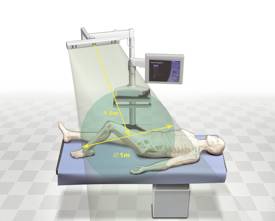 B
B
The operation takes place with what is called blood supply arrest, so that the infusion of outside blood or his own blood can be minimized.
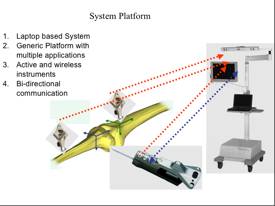
Photo B shows a schematic representation of the patient on the operating table and shows the navigating device, about 1.5m from the patient. Using infra-red technology, the trackers communicate bi-directionally to and from the femur and tibia to the navigation device.
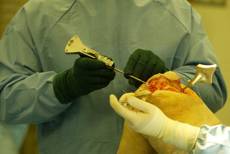
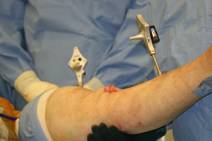
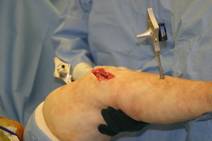
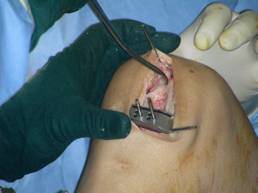
Picture 1:
Setting the navigation “trackers”
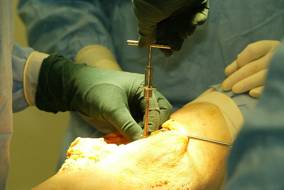
The trackers are attached to the femur and the tibia by two small incisions. They permit an exact determination of all relevant data during the operation with the aid of the navigation system.
 A
A
A: Attachment of a tracker on the femur through the conventional entry of 15-18cm (old method).
 B
B
B: Attachment of both trackers to the femur and tibia by two separate, small cuts using the minimally invasive method, with a skin incision of only 8-12cm (new and current method).
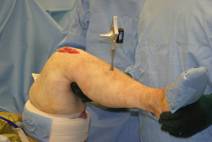
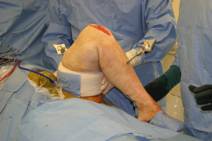
Picture 2:
Orientation of the “trackers”
The transmitters for the navigation device are mounted (photo A). Now the orientation of the transmitters in the trackers is so set that ideally they communicate with the communication device and with the built-in receivers (photo B).
 A
A 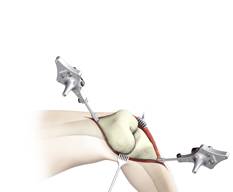 B
B
Picture 3:
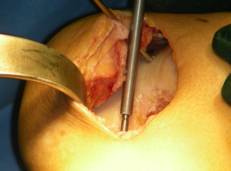
The knee joint is digitalized
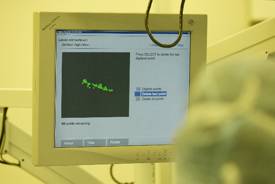
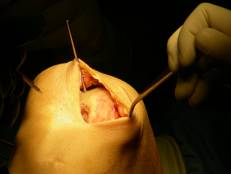
With the help of the pointer, anatomic reference points of the knee that are important for the operator (e.g., knee protuberances) are digitalized (photo C). The operator can see the corresponding digitalized points directly on the computer screen and if necessary make immediate corrections (photo A).
All the important data are recorded directly during the operation, and therefore no expensive additional studies, such as computerized tomography and the like, are necessary before the operation. Open computer-navigated technology (photo B) and minimally invasive computer navigated technology (photo C).
 A
A
 B
B 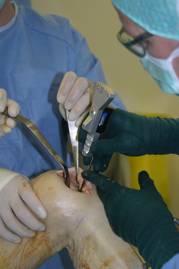 C
C
Picture 4:
Digitalization
This illustration shows once again the digitalization with the help of the pointer, which serves as the digital finger of the operator. The navigation system shows the exact points of the recorded anatomy, shown here with an example of digitalization of the center of the tibial joint surface (photos A and B) and the corresponding reproduction on the computer (photo C).
 A
A
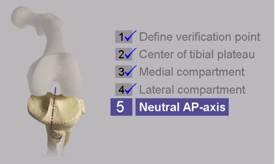 B
B
 C
C
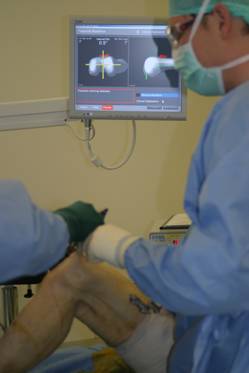
Picture 5:
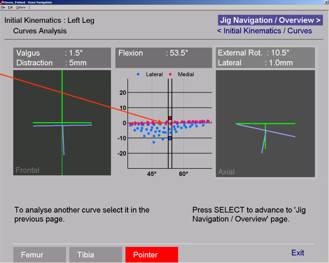
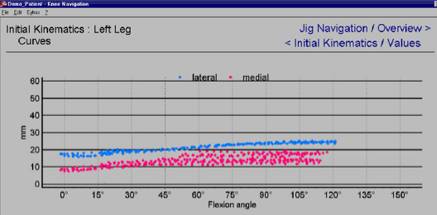
Axes and kinematics
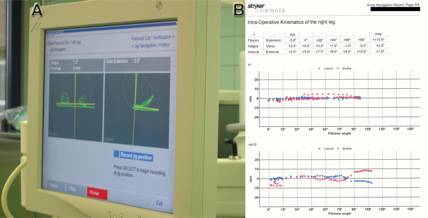
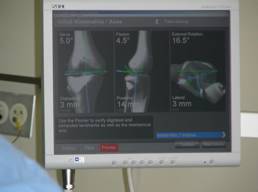
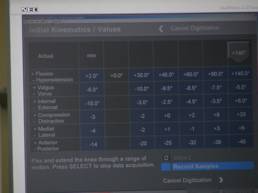
By movement of the knee joint, the soft tissue relationships are tested before the implantation of the prosthesis. The operator discerns the axial relationships of the leg on the screen of the navigation system. This illustration shows the operator’s view of the screen of the navigation system in the determining of the leg axes (photo A) and the kinematics (photo B).
 A
A
 B
B
Minimally invasive computer navigated technology MIS (photos A-D).
 A
A
 B
B
 C
C
 D
D
Picture 6:
Axes and kinematics
This illustration shows the operator’s view of the screen of the navigation system in the determining of the leg axes (photos A-C). The operator receives important information about the axial relationships: Varus-valgus (left picture), flexion-extension (center picture), internal and external rotation (right picture) (photos A and B).
 A
A 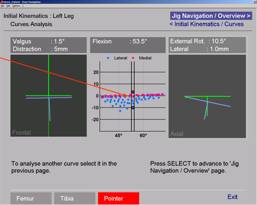 B
B
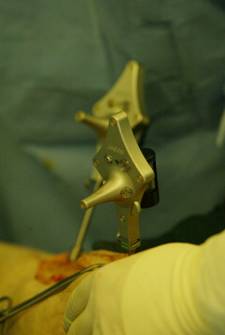
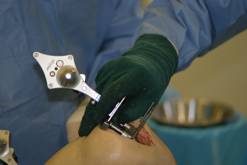
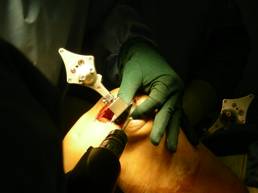
Picture 7:
Upper leg bones, tracker, and navigated incision block
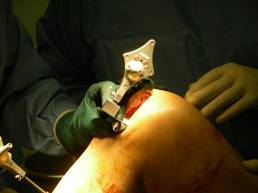
This illustration shows the femur with the “trackers” for the navigation system and the incision block (here with the fixed incision mask, the “dedicated jig” (photos A and B). This old technology has today been replaced by the mobile incision block technique (see below).
 A
A 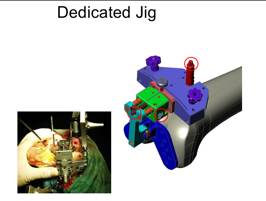 B
B
MIS technique with the mobile incision block (photos A and B).
 A
A
 B
B
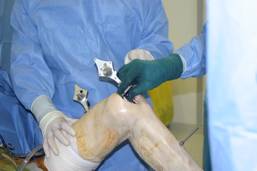
B technique with a mobile incision block: The surgeon adjusts the incision block in the desired position depending on varus-valgus, flexion-extension, and slope, based on the data on the computer (photo A). The incision block is then fixed in the desired position with small nails. Then the appropriate bone cut is done with the saw.
Picture 8:
Adjustment of the rotation of the femoral components
(prosthetic twisting of the femoral part)
The MIS technique with a mobile incision block (photo A).
 A
A
View of the computer screen with adjustment of the desired position of the mobile incision block (photo B)
 B
B
Picture 9:
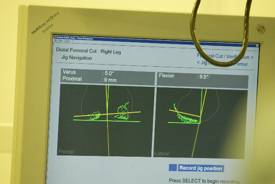
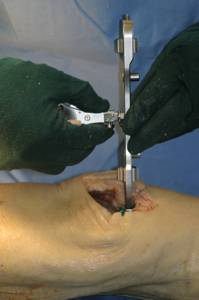
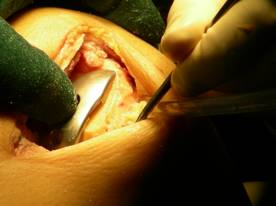
Exactness
With the aid of the navigation system, the saw cut for the femur is positioned with a tolerance of 0.3 millimeters or 0.3 degrees (photos A and B).
Picture 10:
Sawing the femur
The operator saws the femur in shape for the later correct, best possible seating of the prosthesis. Open computer-navigated technology (photo A) and minimally invasive computer navigated technology (photo B).
 A
A 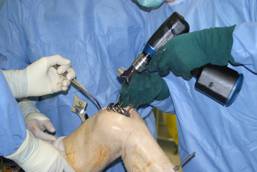 B
B
Picture 11:
Cutting of the tibial plane and monitoring of the rotation relationships of the tibial component (orientation of the lower leg part of the knee prosthesis)
 A
A
Minimally invasive computer navigated technology with mobile incision block (photo A)
 B
B
Monitoring of the rotation relationships of the tibial component with the aid of the navigation system (photo B)
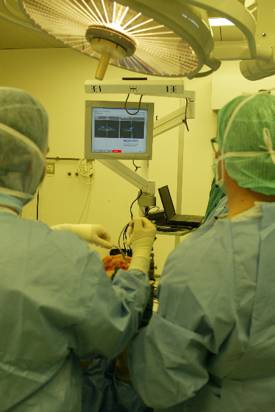
Picture 12:
Monitoring possibilities
Even though the navigation system is managed completely by the operator, at any time an assistant in the operating room can review the data at the computer.
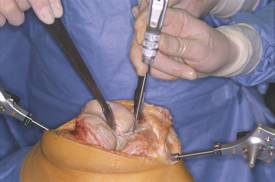
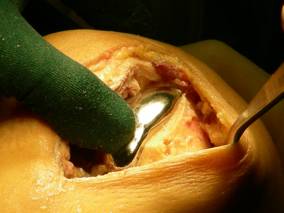
Picture 13:
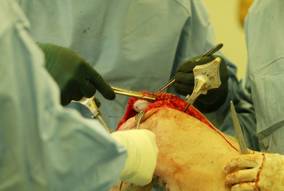
Implantation of the test prosthesis
After the upper leg and lower leg bones are prepared for the implantation, the operator then inserts a test prosthesis. Open computer-navigated technology (photo A) and minimally invasive computer navigated technology (photo B).
 A
A
 B
B
Picture 14:
Check of the seating of the prosthesis
The seating of the test prosthesis is checked with the help of the navigation system. Only when the operator is 100% satisfied with the result is the final prosthesis implanted. Monitoring of the varus-valgus and flexion-extension relationships of the femoral components (photo A) and testing of the kinematics (photos B and C).

Picture 15:
End of the operation
The operation is over after about 1 hour and 45 minutes; the skin is again closed. The final result is visible on illustrations 3 and 7. Open computer-navigated technology (photo A) and minimally invasive computer navigated technology (photo B).
 A
A
 B
B
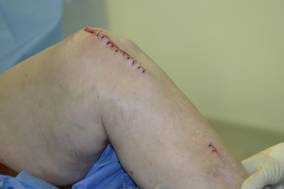
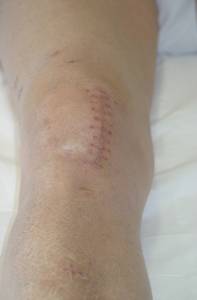
Picture 16:
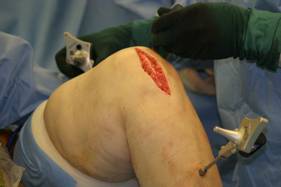
Patient after two weeks
Scar after a minimally invasive computer-navigated procedure (photo A). The patient stands upright (photo B).
 A
A 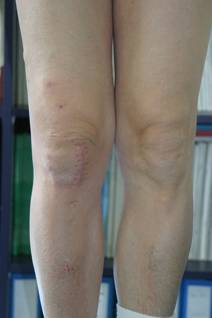 B
B
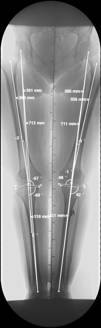
Picture 17:
Radiological images of the patient before and after the operation
Orthoradiogram in standing position: Pre-operative image with a varus gonarthrosis left of 20 (photo A) and post-operative image after MIS computer navigated implantation of knee TP (NRG system by the Stryker Co.) left with a straight leg axis (photo B).
 A
A 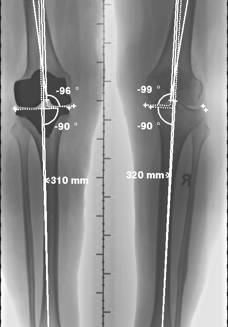 B
B
2.2.3.6 MIS Computer-Navigated Implantation of a Total Knee Arthroplasty TKA (MIS: Minimally Invasive Surgery)
Minimally invasive surgery (MIS) allows the implantation of a knee endoprosthesis through a small skin incision, thus allowing maximum sparing of the soft tissue. The chief aim of this new operation method is the reduction of surgical trauma with minimal damage to the bones and the soft tissue. Thanks to this minimally invasive technique, it is possible to reduce the incision from 15-18cm to 8-12cm. This allows protection of the musculature and the ligaments. This new method of operation results in fewer post-operative pains and a faster rehabilitation.
This new operating method may still cause dangerous complications if the invasive procedure is not done by a well experienced team. The operating surgeon has only a limited view of the operation area through the small opening, and, if there is incorrect estimation of the relationships, an incorrect positioning of the prosthesis may result in a malpositioning, resulting in instability of the femoral and tibial components.
Thanks to the support by the navigation system, it is possible for the experienced operator to achieve a precise adjustment of the position and stability of the femoral and tibial components even through this small entry with a margin of error of only 0.3mm or 0.3 degrees.
The advantages of this mode of operation are not only a reduction of the post-operative pains, but also a more rapid post-operative rehabilitation and early load bearing for the knee prosthesis. After 3-4 days the patient can walk with full load bearing without crutches. This is, however, only possible if the prosthesis is implanted perfectly with regard to the axis and rotation and to the stability of the ligaments. Merely minimal changes can cause pain and premature loosening of the prosthesis, which in turn would make necessary an early change of prosthesis with high follow-up costs.
This new mode of operating requires no additional radiological or computerized tomographic pre-studies, and after some experience can even reduce the length of the operation. The rehabilitation period and the patient’s length of stay in the hospital become shorter; the life of the prosthesis becomes longer.
From these points of view, computer navigation in the future will bring about a reduction of costs for health care, but computer-assisted navigation will never replace the surgeon's experience.
2.2.3.7 Post-Operative Video Recording after MIS Computer-Navigated Total Knee Arthroplasty TKA
In the following video recordings, there is the possibility of seeing some examples after minimally invasive implantation of a knee endoprosthesis (so-called MIS TKA). Here I would like to again thank the individual patients for their kind permission.
I. Exemples of video before and after the MIS TKA taking in a chronological way:
- One day before the MIS implantation of a knee endoprosthesis:
Please click here
- One day after the MIS implantation of a knee endoprosthesis:
Per favore puntare il pulsante qui
Per favore puntare il pulsante qui
Per favore puntare il pulsante qui
Per favore puntare il pulsante qui
- 2 days after the MIS implantation of a knee endoprosthesis:
Per favore puntare il pulsante qui
Per favore puntare il pulsante qui
Per favore puntare il pulsante qui
Per favore puntare il pulsante qui
Per favore puntare il pulsante qui
Per favore puntare il pulsante qui
Per favore puntare il pulsante qui
- 3 days after the MIS implantation of a knee endoprosthesis:
Per favore puntare il pulsante qui
Per favore puntare il pulsante qui
Per favore puntare il pulsante qui
Per favore puntare il pulsante qui
- 4 days after the MIS implantation of a knee endoprosthesis:
Per favore puntare il pulsante qui
Per favore puntare il pulsante qui
Per favore puntare il pulsante qui
Per favore puntare il pulsante qui
Per favore puntare il pulsante qui
Per favore puntare il pulsante qui
Per favore puntare il pulsante qui
Per favore puntare il pulsante qui
Per favore puntare il pulsante qui
- 5 days after the MIS implantation of a knee endoprosthesis:
Per favore puntare il pulsante qui
Per favore puntare il pulsante qui
- 6 days after the MIS implantation of a knee endoprosthesis:
Per favore puntare il pulsante qui
- 8 days after the MIS implantation of a knee endoprosthesis:
Per favore puntare il pulsante qui
- 10 days after the MIS implantation of a knee endoprosthesis:
Per favore puntare il pulsante qui
- 3 weeks after the MIS implantation of a knee endoprosthesis:
Per favore puntare il pulsante qui
Per favore puntare il pulsante qui
Per favore puntare il pulsante qui
- 4 weeks after the MIS implantation of a knee endoprosthesis:
Per favore puntare il pulsante qui
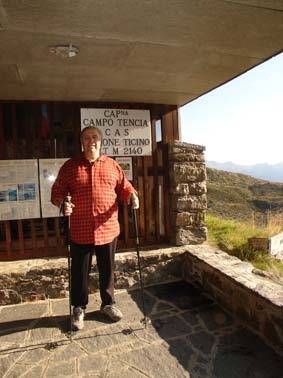
Un paziente 4 settimane dopo l'impianto di una protesi alla Capanna Campo Tencia (2140 m).
- 6 weeks after the MIS implantation of a knee endoprosthesis:
Per favore puntare il pulsante qui
Per favore puntare il pulsante qui
Per favore puntare il pulsante qui
Per favore puntare il pulsante qui
- 6 months after the MIS implantation of a knee endoprosthesis:
Per favore puntare il pulsante qui
II. Exemples of video after the MIS TKA taken with the same patient:
- Patient A: 2 days after MIS computer-navigated implantation of a knee endoprosthesis on the left.
Please click here
- The same patient A: 10 weeks after MIS computer-navigated implantation of a knee endoprosthesis on the left.
Please click here
- Patient B:2 days after MIS computer-navigated implantation of a knee endoprosthesis on the right.
Please click here
- The same patient B: 5 days after MIS computer-navigated implantation of a knee endoprosthesis on the right.
Please click here
- Patient C: 3 weeks after MIS computer-navigated implantation of a knee endoprosthesis on the right.
Please click here
- Patient D: 6 weeks after MIS computer-navigated implantation of a knee endoprosthesis on the right.
Please click here
- Patient E: 6 weeks after MIS computer-navigated implantation of a knee endoprosthesis on the left.
Please click here
- Patient F: 4 days after MIS computer-navigated implantation of a knee endoprosthesis on the left.
Please click here
- Patient G: 3 weeks after MIS computer-navigated implantation of a knee endoprosthesis on the right.
Please click here
- Patient H: 2 days after MIS computer-navigated implantation of a knee endoprosthesis on the left.
Please click here
- The same patient H: 4 days after MIS computer-navigated implantation of a knee endoprosthesis on the left.
Please click here
- The same patient H: 6 days after MIS computer-navigated implantation of a knee endoprosthesis on the left.
Please click here
- The same patient H: 8 days after MIS computer-navigated implantation of a knee endoprosthesis on the left.
Please click here
- The same patient H: 3 weeks after MIS computer-navigated implantation of a knee endoprosthesis on the left.
Please click here
- Patient I: 1 day after MIS computer-navigated implantation of a knee endoprosthesis on the left.
Please click here
- The same patient I: 2 days after MIS computer-navigated implantation of a knee endoprosthesis on the left.
Please click here
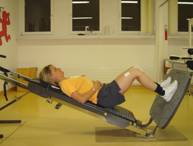
- The same patient I: 4 days after MIS computer-navigated implantation of a knee endoprosthesis on the left in physical therapy in the so-called "knee group" with other patients post-MIS knee TP. Here the patient is exercising the quadriceps musculature with a closed musculo-skeletal system.
Please click here
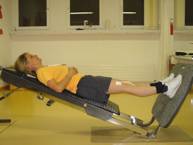
- The same patient I: 4 days after MIS computer-navigated implantation of a knee endoprosthesis on the left in physical therapy in the so-called "knee group" with other patients post-MIS knee TP. Here the patient is exercising the hamstring musculature with a closed musculo-skeletal system.
Please click here
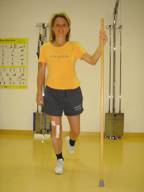
- The same patient I: 4 days after MIS computer-navigated implantation of a knee endoprosthesis on the left in physical therapy in the so-called "knee group" with other patients post-MIS knee TP. Here the patient is doing balance exercises.
Please click here
- The same patient I: 4 days after MIS computer-navigated implantation of a knee endoprosthesis on the left in physical therapy in the so-called "knee group" with other patients post-MIS knee TP. Here the patient is again exercising the quadriceps musculature with a closed musculo-skeletal system.
Please click here
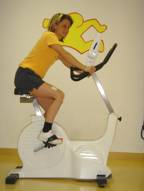
- The same patient I: 4 days after MIS computer-navigated implantation of a knee endoprosthesis on the left in physical therapy in the so-called "knee group" with other patients post-MIS knee TP. Here the patient is exercising with the stationary bicycle.
Please click here
- The same patient I: 4 weeks after MIS computer-navigated implantation of a knee endoprosthesis on the left.
Please click here
- Patient J: 4 day after MIS computer-navigated implantation of a knee endoprosthesis on the left. The patient is able to walk full load bearing without crutches.
Please click here
- 82 years old patient 3 days after MIS computer-navigated Total Knee Arthroplasty left and 4 months after MIS computer-navigated TKA right.
Please click here
************************************************
- Il paziente k: La mattina dopo l'impianto di una protesi totale al ginocchio destro con tecnica minimale invasiva e con la navigazione computerizzata. Il paziente puo' muovere la gamba e piegare il ginocchio operato senza dolori.
Per favore puntare il pulsante qui
- Lo stesso paziente k: Il pomeriggio il 1 giorno dopo l'impianto di una protesi totale al ginocchio destro con tecnica minimale invasiva e con la navigazione computerizzata. Il paziente puo' muovere la gamba e piegare il ginocchio operato senza dolori.
Per favore puntare il pulsante qui
- Lo stesso paziente k: Il pomeriggio il 1 giorno dopo l'impianto di una protesi totale al ginocchio destro con tecnica minimale invasiva e con la navigazione computerizzata. Il paziente continua la mobilizzazione con l'aiuto dell'infermiera.
Per favore puntare il pulsante qui
- Lo stesso paziente k: Al secondo giorno dopo l'impianto di una protesi totale al ginocchio destro con tecnica minimale invasiva e con la navigazione computerizzata. Il paziente puo' muovere la gamba e piegare il ginocchio operato senza dolori.
Per favore puntare il pulsante qui
- Lo stesso paziente k: 2 giorno dopo l'impianto di una protesi totale al ginocchio destro con tecnica minimale invasiva e con la navigazione computerizzata. Il paziente puo' camminare senza dolori con le stecche per proteggere la ferita.
Per favore puntare il pulsante qui
- Lo stesso paziente k: 3 giorno dopo l'impianto di una protesi totale al ginocchio destro con tecnica minimale invasiva e con la navigazione computerizzata. Il paziente va in fisioterapia da solo e continua a fare gli eserciz imparati giorni prima.
Per favore puntare il pulsante qui
- Lo stesso paziente k: 3 giorno dopo l'impianto di una protesi totale al ginocchio destro con tecnica minimale invasiva e con la navigazione computerizzata. Il paziente puo' muovere la gamba e piegare il ginocchio operato senza dolori.
Per favore puntare il pulsante qui
- Lo stesso paziente K: il paziente migliora la mobilità e la forza muscolare del ginocchio operato con la bicicletta 3 giorni dopo l'impianto di una protesi al ginocchio destro con la tecnica minimale invasiva.
Per favore puntare il pulsante qui
- Lo stesso paziente K: il paziente migliora la mobilità e la forza muscolare del ginocchio operato con la Totalgym 3 giorni dopo l'impianto di una protesi al ginocchio destro con la tecnica minimale invasiva.
Per favore puntare il pulsante qui
- Lo stesso paziente K: 5 giorni dopo l'impianto di una protesi al ginocchio destro con la tecnica minimale invasiva il paziente cammina senza stampelle e senza dolori.
Per favore puntare il pulsante qui
- La paziente L: 10 mesi dopo l'impianto di una protesi al ginocchio destro con la tecnica minimale invasiva. Gli esempi dei pazienti K e L dimostrano come questa technica minimale invasiva computerizzata ha molto successo anche nelle persone con una grossa musculature.
Bitte hier klicken
- La paziente M: 6 giorni dopo l'impianto di una protesi al ginocchio destro con la tecnica minimale invasiva e 12 mesi dopo l'impianto di una protesi al ginocchio sinistro con la tecnica minimale invasiva.
Per favore puntare il pulsante qui
- Il paziente N: Alcuni giorni prima dell'impianto di una protesi alle ginocchia.
Per favore puntare il pulsante qui
- Lo stesso paziente N: 2 giorni dopo l'impianto di una protesi al ginocchio destro con la tecnica minimale invasiva.
Per favore puntare il pulsante qui
- Lo stesso paziente N: 4 giorni dopo l'impianto di una protesi al ginocchio destro con la tecnica minimale invasiva.
Per favore puntare il pulsante qui
- Lo stesso paziente N: 4 giorni al pomeriggio nella fisioterapia dopo l'impianto di una protesi al ginocchio destro con la tecnica minimale invasiva.
Per favore puntare il pulsante qui
- Lo stesso paziente N: 6 settimane dopo l'impianto di una protesi al ginocchio destro con la tecnica minimale invasiva.
Per favore puntare il pulsante qui
- Il paziente O: 4 giorni dopo l'impianto di una protesi al ginocchio destro con la tecnica minimale invasiva.
Per favore puntare il pulsante qui
- Lo stesso paziente O: 4 giorni al pomeriggio nella fisioterapia dopo l'impianto di una protesi al ginocchio destro con la tecnica minimale invasiva.
Per favore puntare il pulsante qui
- Lo stesso paziente O: 6 settimane dopo l'impianto di una protesi al ginocchio destro con la tecnica minimale invasiva.
Per favore puntare il pulsante qui
- Il paziente P: 2 giorni dopo l'impianto di una protesi al ginocchio destro con la tecnica minimale invasiva.
Per favore puntare il pulsante qui
- Lo stesso paziente P: 4 giorni al pomeriggio nella fisioterapia dopo l'impianto di una protesi al ginocchio destro con la tecnica minimale invasiva.
Per favore puntare il pulsante qui
- Lo stesso paziente P: 8 giorni dopo l'impianto di una protesi al ginocchio destro con la tecnica minimale invasiva.
Per favore puntare il pulsante qui
- Lo stesso paziente P: 10 giorni dopo l'impianto di una protesi al ginocchio destro con la tecnica minimale invasiva.
Per favore puntare il pulsante qui
2.2.3.8 X-ray Findings After Implantation of an MIS Computer-Navigated Total Knee Prosthesis
 A
A 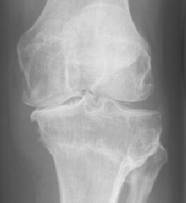 A'
A'
 B
B
 C
C
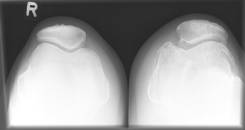
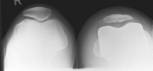
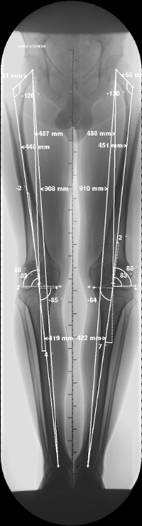
(Illustration 4): A patient with a secondary general gonarthrosis on the left.The patient was operated on 20 years previously with a proximal tibia valgization osteotomy (cf. section 2.2.2 “Adjustment Osteotomy”) for correction of an arthrosis of the inner joint compartment (the so-call medial femoro-tibial joint compartment).Pre-operative X--ray images: Knee on both sides in standing position (photo A and enlargement with photo A'), side view of the left knee joint (photo B), and axial view of both knees (photo C) with a severe arthrosis of the left knee joint.
 A
A
 B
B
 C
C
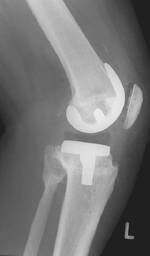
(Illustration 5): Post-operative image:The same patient 3 days after implantation of a total-knee prosthesis (Stryker Co. NRG system) on the left with the minimally invasive technique and the Stryker-Leibinger computer-aided navigation system. Patient knee (photo A) and side view (photo B) of the left knee joint and axial view of both knee joints (photo C – the left photo shows the kneecap after implantation of a patella prosthesis).
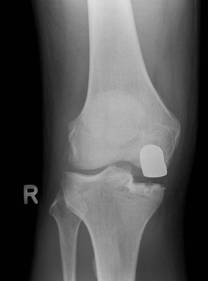
A single compartment knee prosthesis comes into consideration if it is the medial or, more rarely, the side part of the knee joint that is primarily damaged. The other sections of the knee joint still show minor cartilage changes, and the knee ligament structures are intact (see illustration 6).
(Illustration 6) Arthrosis primarily of the inner knee joint compartment.
A partial prosthesis of the knee joint (e.g., the EIUS system or the UNIX system from Stryker) is implanted in the orthopedics department of the Oberengadin Hospital essentially with the aid of the open computer navigation system from Stryker-Leibinger through a minimally invasive incision.
Aided by the navigation system, the new, small instruments allow not only a better view of the operation area, but also a more precise implantation of the femoral and tibial components of the single compartment knee prosthesis. A six to eight centimeter long incision is enough for access to the joint.
With minimally invasive operative techniques, the patients can be made mobile early. The joint may be full load bearing as early as the day of the operation. Thus, as in the implantation of a total prosthesis, both the duration and the costs of in-patient treatment can be reduced.
The advantages of computer-navigated implantation of a single compartment knee prosthesis are:
- Small operative incisions, especially with no damage to the upper leg musculature through the incision
- No luxation of the Kneecap with less pain and sooner full load bearing
- Operation that spares the soft tissue
- Proprioceptive reflexes are retained.
- Normal re-creation of the joint line
- Very precise implantation of the upper and lower leg bone components
- Minimal bone resection of the upper and lower leg bones. If necessary, the partial prosthesis can later be exchanged for a total prosthesis.
- Conservation of all ligaments, the opposing joint compartment, and the patello-femoral joint
- Re-creation of a normal, natural movement and a “more normal” feel in the knee joint
- The patient is mobile very soon
- Quicker post-operative rehabilitation
- Short hospital stay
The single compartmental partial knee prosthesis (the EIUS or UNIX systems by Stryker Co., cf. illustration 7) is regularly implanted in the orthopedics department of the Oberengadin Hospital by minimally invasive surgery with the support of the open computer navigation system from the Stryker-Leibinger Co.
 A
A 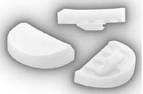 B
B 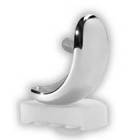 C
C
(Illustration 7) The EIUS single compartment partial knee prosthesis by Stryker Co. The femoral component (A), the tibial component (B), and both components together (C).
The following illustrations explain the individual steps in the computer-navigated implantation of a single compartment knee prosthesis with the system by Stryker-Leibinger AG.
Preparation of the patient and setting of the navigation trackers is similar to that in the implantation of a total knee arthroplasty (cf. illustrations 0 and 1 at the pages 15-16).
Picture 0:
Incision
Minimal anteromedial incision 6 to 8cm long. The clear wearing away of the inner part of the knee joint is recognizable in the picture.
Picture 1:
The inner part of the knee joint is digitalized.
With the help of the pointer, anatomic reference points of the knee that are important for the operator (e.g., upper surface of the femur and tibia) are digitalized.
This illustration shows once again the digitalization with the help of the pointer, which serves as the digital finger of the operator. All important data are recorded directly during the operation.
Picture 2:
Axes and kinematics
By movement of the knee joint, the soft tissue relationships are tested before the implantation of the prosthesis. The operator sees the axial relationships of the leg (photo A) and of the kinematics (photo B) on the screen of the navigation system.
 A
A
 B
B
Picture 3:
Tibia, tracker, and navigated incision block
This illustration shows the femur with the “trackers” for the navigation system and the mobile incision block technique (photo A).
The surgeon adjusts the incision block in the desired position depending on varus-valgus, flexion-extension, and slope, based on the data on the computer (photo A).
 A
A
The incision block is then fixed in the desired position with small nails (photo B).
 B
B
Picture 4:
Sawing the femur
The operator saws the femur for the best possible seating of the prosthesis. The desired position can be continually corrected based on the computer data.
Picture 5:
Implantation of the test prosthesis
After the upper leg and lower leg bones are prepared for the implantation, the operator then inserts a test prosthesis (photo A). Hereyou can see the femoral component of the prosthesis with the minimally invasive technique (photo A) and the schematic view of the unicompartimental prosthesis (photo B).
 A
A  B
B
Picture 6:
Implantation of the definitive prosthesis
Here the femoral component is going to be implanted with cement.
Picture 6:
End result
The end result is apparent on this illustration.
Radiological view of an example of a cemented medial single compartment knee prosthesis (EIUS by Stryker Co.)
 A
A 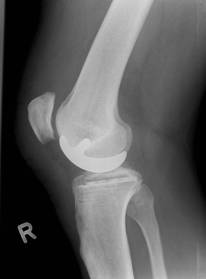 B
B
(Illustration 6) Radiological views after the operation: standing view ap with weight-bearing (photo A) and lateral view (photo B) after implanation of a MIS computer-navigated medial unicompartimental knee prosthesis EIUS.
Picture 7:
Radiological images before and after the operation
 A
A 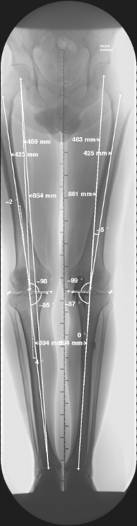 B
B
Orthoradiogram in standing position: Pre-operative view of a varus gonarthrosis of 70 right (picture A) and post-operative view 6 weeks post-operative, using an MIS computer navigated implantation for a cemented medial single compartment knee prosthesis (Stryker Co. UNIX system) with a straight leg axis on the right (picture B).
2.2.3.10 Post-Operative Video Recording After MIS Computer-Navigated Implantation of a Unicompartment Knee Prosthesis
In the following video recordings, you can see some examples after implantation of an MIS computer navigated single compartment knee endoprosthesis. Here I would like to again thank the individual patients for their kind permission.
- Patient A: 2 days after MIS computer-navigated implantation of a medial single compartment knee endoprosthesis on the right.
Please click here
- The same patient A: 5 days after MIS computer-navigated implantation of a medial single compartment knee endoprosthesis on the right.
Please click here
- The same patient A: 3 weeks after MIS computer-navigated implantation of a medial single compartment knee endoprosthesis on the right.
Please click here
- Patient B: 2 days after MIS computer-navigated implantation of a medial single compartment knee endoprosthesis on the left.
Please click here
- The same patient B:4 days after MIS computer-navigated implantation of a medial single compartment knee endoprosthesis on the left.
Please click here
- The same patient B:6 days after MIS computer-navigated implantation of a medial single compartment knee endoprosthesis on the left.
Please click here
- The same patient B:5 weeks after MIS computer-navigated implantation of a medial single compartment knee endoprosthesis on the left.
Please click here
2.2.3.11 Information on Physical Therapy for Knee Prosthesis Patients
Per potere ricevere e leggere altre informazioni piu' dettagliate sulla reabilitazione fisioterapeutica dopo l'impianto di una protesi con la tecnica minimale invasiva e con la navigazione computerizzata vi preghiamo di scaricare questo ducumento PDF:
Per favore puntare il pulsante qui
Admission Day
In the early evening you will be visited by a therapist from our physical therapy team. At that time you will be briefly questioned about the pre-history of your knee pain. Your knee will be tested for mobility. Crutches will be adapted for you, and you will receive initial instructions on how to walk with crutches and how to negotiate steps with them.
In addition, you will be shown breathing exercises, which after the operation should lead to conscious deep breathing in order to avoid possible complications (e.g., lung infection).
Day of the Operation
After the operation, a therapist will come by and review the breathing exercises with you. You should do these at least 10 times an hour.
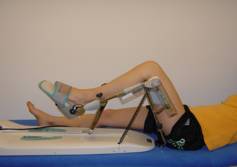
We will adjust for you movement rails (kinetic rails) for maintaining movement (or, if needed, at a specific resting position). Your knee will undergo passive motion for an hour at a time in a 90° bent position (so that your muscles stay relaxed), after which it will moved beyond a movement of 90° and then positioned in maximum extension (Extended resting position is not allowed on the kinematics rails.)
This “changing position” is however only used if you are pain-free. Otherwise, the bending angle will be adjusted according to the sensitivity to pain.
Day 1 After the Operation
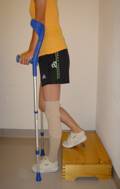
On the first day after the operation, you will be able to sit. If your strength allows it, you may get up for the first time and take your first steps on crutches or with other walking aids (as far as feeling is present in the legs).
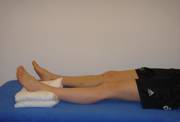
The operated leg will be taped up to the knee joint; the “healthy one,” up to the height of the knee. This serves for helping the circulation.
The operator sets the load bearing limit (in kg) of the operated leg. The responsible physical therapist will inform you about this and instruct you.
In resting position, pay attention to an extended placement of the knee, with a pillow under the heel (unless prescribed otherwise).
The movement rails are to be use three times a day for an hour starting with the first day after the operation. Slowly begin to increase the angle of bending in a way that you have no pain, but you perceive only an increased feeling of tension that is bearable for you.
Day 2 After the Operation
Great importance is set on active knee stretching after the operation. That means that it is important that you learn to tense the frontal thigh muscle (quadriceps muscle) and practice it. The physical therapist will instruct you in various exercises to this, and ask you to do these several times a day. In this way you will achieve a stable and safe “knee feeling” when you walk.
In various walking exercises, we will keep mentioning this stretching out of the knee (if necessary), which also is very important for walking; it is necessary to exercise the knee in a purposeful manner.
For active bending, it makes sense for you to bend the operated knee pain-free several times a day. In doing this, be sure that the heel maintains contact with the mattress.

The load limit and the position of the operated leg will remain unchanged for a few days. Up to the fifth post-operative day, take care that the operated leg remains bandaged over the knee joint in walking and sitting (exception: using the toilet). It may occur that in some cases the bandage should be worn even somewhat longer.
The 3rd and Subsequent Days Following the Operation
As soon as the infusion lines are removed, walking up and down stairs should be your next goal. To achieve an ergonomic way of walking as soon as possible, we will analyze your walking posture several times in order to give individual corrections and to instruct you with appropriate exercises.

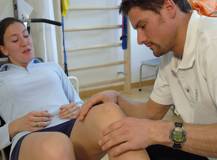
Good healing also includes scar treatment. You will receive exact information from your therapist on how to do this by yourself morning and evening.
The movement rails should continue to be used in the same rhythm in order to achieve or maintain as great an angle of bending as possible on a continuing basis. When you are invited by the physical therapist to join knee TP group therapy, twice-a-day use of the movement rails will be sufficient.
In the second half of your in-patient stay – i.e., as soon as you reach a passive bending angle of 90° and you can walk independently in the physical therapy areas – we will offer you a second therapy unit to follow each day.
This is designed as group therapy. You will learn new exercises on a cumulative basis each day and complete them in a set course. The duration and intensity of the exercises will be adapted daily to your abilities. Here you will meet other knee TP patients, and you will be able to share your experiences.
Knee TP Group Therapy
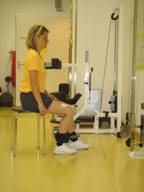
The Individual Exercises
Total Gym
This exercise serves to improve the bending and stretching of the knee joint with increasing weight. It has good effects on your circulation and helps the course of healing.
Bicycle
Bike riding serves to improve bending and stretching of the knee joint, and is very good for the circulation. The length of the pedal stroke on the operated side can be adjusted to the bending angle that is possible for you.
Coordination Exercises
Here you will practice in various ways to stand on one leg. This promotes security and control of the operated knee in walking with increasing load bearing and on uneven surfaces.
Getting up from a Seated Position
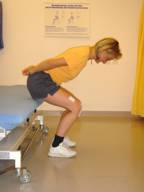
This exercise serves mostly to strengthen the stretching musculature of the knee.
Bending the Knee
This exercise serves mostly to strengthen the bending musculature of the knee.
We will support you with many other physical therapy measures (e.g., techniques to restore muscle tone, stretches, etc.) to achieve a wound healing phase as free as possible of irritation and pain. In this sense we wish you a pleasant post-operative treatment. If there is something you don’t understand right away or if you have further questions, the physical therapist in charge will give you advice.
P.S. On our website you will find further information regarding the minimally invasive, computer navigated implantation of knee prostheses and regarding other treatments by the orthopedic-trauma-sports medicine department of the Oberengadin Hospital:
www.orthopaedie-samedan.ch
www.sportmedizin-samedan.ch
2.2.3.10 Riprese video con istruzioni sulla fisioterapia
In questi video si possono vedere pazienti, che hanno dato gentilmente il loro permesso, dopo l'impianto di una protesi al ginocchio:
Il paziente rafforza la musculatura dei muscoli quadricipidi con una lavoro a catena chiusa.
Per favore puntare il pulsante qui
Il paziente rafforza la musculatura dei muscoli ischiocrurali con una lavoro a catena chiusa.
Per favore puntare il pulsante qui
Il paziente fa esercizi di equilibrio.
Per favore puntare il pulsante qui
Il paziente rafforza la musculatura dei muscoli quadricipidi con una lavoro a catena chiusa.
Per favore puntare il pulsante qui
Il paziente rafforza la musculatura con la bicicletta.
Per favore puntare il pulsante qui
Il paziente migliora la mobilità del ginocchio operato con esercizi di movimento attivo assistivo aumentando lentamente la flessione del ginocchio.
Per favore puntare il pulsante qui
P.S. Ulteriori informazioni sulla navigazione computer-assistita del ginocchio e tutto il decorso operatorio possono essere visitati sui siti internet:
www.sportmedizin-samedan.ch
www.orthopaedie-samedan.ch
