Arthrosis of the Hip Joint
Coxarthrosis:
High Tech in the Operating Room
- Minimally Invasive (MIS) Total Hip Prosthesis
- Computer-Navigated Implantation of a Minimally Invasive (MIS) Total Hip Prosthesis
Index
I. Introduction to Hip Joint Arthrosis (Coxarthrosis)
- 1.1 General on Coxarthrosis
- 1.2 What is a Coxarthrosis?
- 1.3 Course of the Disease
II. Treatment of Coxarthrosis
- 2.1 Conservative Therapy
- 2.2 Operative Therapy – “The Total Hip Arthroplasty – THA ”
-
2.2.1 Introduction
-
2.2.2 Information on the Operation
-
2.2.3 Minimally Invasive Implantation of a Total Hip Arthroplasty “MIS THA” Using the Stryker-Leibinger System
-
2.2.5 High Tech in the Operating Room – Minimally Invasive Computer-Supported Implantation of a Total HipArthroplasty “MIS THA ” Using the Stryker-Leibinger System
I. Introduction to Hip Joint Arthrosis (Coxarthrosis)
1.1 General on Coxarthrosis
The hip joints are among the joints in the human body that bear the most weight. Due to upright walking in humans, they bear the entire weight of the torso. The hip joint consists of the acetabulum (= “vinegar bowl”; from the Latin, based on its particular shape) in the pelvic bones and the head of the femur.
As opposed to the knee joint, which is stabilized by ligaments, muscles, and the meniscus, the hip joint has a bony guide, the acetabulum. Both the acetabulum and the head of the femur are covered with a cartilage layer. In movement, the two cartilage layers slide past one another, rpoviding frictionless movement. Tight ligament systems also fix the head of the femur in the acetabulum. The musculature of the hips plays an important role. It provides for fixation of the head of the femur in the acetabulum and keeps the pelvis straight, thus assuring the stance on two legs and upright walk. The hip joint, like every joint, can function at its best only if all its parts are healthy. If the joint is once damaged, wear and tear follows.
In this regard it is important that as early as at age 30 changes are identifiable in all joints of the human body that correspond to the aging process of the ligaments and the connective tissue. By age 40, degenerative joint changes (= changes due to wear and tear) are noticeable on X-ray images. Since we human beings are increasingly living longer, the role of degenerative diseases is growing. And so one can determine that every person develops arthroses. In orthopedics, treatment of hip joint arthrosis, also called coxarthrosis, is taking an ever more significant place.
1.2. What is a Coxarthrosis?
This refers to a degenerative joint disease of the hip joint that occurs in stages. In this case, the cartilage, so important for the functioning of the joint, deteriorates more and more. Drastically speaking, as a result of the missing joint cartilage, movement in the joint causes rubbing of bone on bone. This leads secondarily to changes in the bone and to inflammatory changes of the joint capsule and surrounding soft-tissue areas.
So-called primary arthroses are distinguished from secondary arthroses. The exact mechanisms of the formation (= pathogenesis) of the primary coxarthrosis are still not completely understood. It is certain that multiple factors promote the origin of the coxarthrosis, such as congenital abnormal positions, biochemical abnormalities, and genetic defects. The most recent research studies in this area show that congenital abnormal positioning in the hip joint, such as rotational deviations of the femur (so-called ante- and retroversion of the neck of the femur), deviation of the acetabulum, and maldevelopment of the form of the femoral neck or of the acetabulum (hip dysplasia), are to be considered the true causes of a primary coxarthrosis. (See illustration 1 for the location of the anatomic structures named here.)
In this respect this is an important fact, since with early diagnosis these mechanical causes can be removed in what are called joint-maintaining operations. In this way a hip joint arthrosis can be avoided, and this means that under certain circumstances a subsequent hip prosthesis implantation is no longer necessary. Secondary hip arthrosis may arise on the basis of metabolic disturbances, improper biomechanical stress because of incorrect positioning in the joint (e.g., “bow legs”), hereditary growth changes in the joint (e.g. morbus perthes, etc.), results of accidents (bone fractures), infections, or age-related changes.
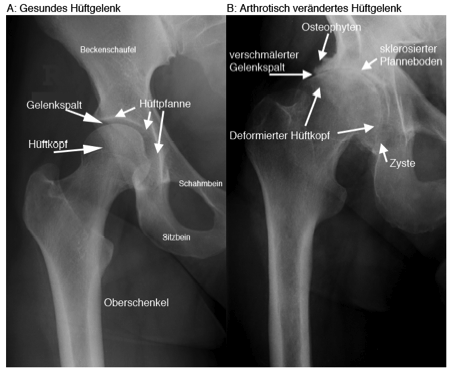
(Illustration 1):Primary coxarthrosis:While the state of the cartilage in the healthy hip joint (A) is discernible by a smooth, evenly formed joint cavity, the joint cavity in the diseased hip joint (B) has become much narrower due to loss of cartilage or has disappeared entirely.In (B) also see the osteophyte formation is clearly visible, as well as the deformation of the neck of the femur, the subchondral sclerosis, and the formation of cysts.
1.3 Course of the Disease
The course of a degenerative joint disease progresses slowly, and is divided into various stages according to the findings and patient complaints. At the beginning of the disease, the loss of elasticity of the hip joint cartilage occurs. On an X-ray image, the first signs are a reduction in the height of the cartilage tissue (visible in a narrowing of the joint cavity). In this early stage of coxarthrosis, the patients often complain of strain-related pains that seem to come from the joint itself or from the surrounding soft tissue areas, such as muscles, tendons, and ligaments.
In the event of painful overload of the joint, muscle tensions occur which serve to protect the endangered tissue. Since the pains from this musculature may play out far from the joint, coxarthrosis in its early stage is often misdiagnosed as “rheumatic disease.” The pathological changes in the arthritic joint can be shown in the X-ray image (see illustration 1).
The second stage of development is the formation of a cavity in the joint cartilage itself and a thickening of the bony structures directly adjacent to the cartilage layer of the joint surface (so-called "subchondral sclerosis" - see illustration 1). The damage to the cartilage causes shearing and pushing forces on the edges of the joint surfaces, leading to the formation of prominent bony growths (so-called “osteophytes”). The second stage is marked by pains in the hip joint upon movement. The pain described by patients upon active movement stems from the musculature and the starting points of the tendons. This pain is an expression of the underlying process of a developing muscle tension, muscle hardness, and also of diseased shortening of the musculature (contracture). In this stage the pain diminishes when the joint is used. That is why the pain is called a warm-up or entry pain, since it recedes after walking a short distance.
The third stage is marked by the progressive wearing away of the joint cartilage, in which the surface of the hip joint that receives stress becomes increasingly smaller. As a result, the bones under the most stressed joint areas recede. These “soft” bones can no longer withstand the load. As a result, fluid-filled cavities, so-called cysts, arise in the bones under pressure. If the cartilage in the hip joint area is completely worn away, bones rub on bones. This leads to grinding down of the bones. The human organism “recognizes” these disease changes, and attempts to counteract them by forming new bony substance. However, the bone cannot be built where it is needed, since this region is under constant load (that is why fractures are fixed with a cast, in addition to their use for pain reduction); the bone is built up in less stressed areas, namely on the edge of the joint. This in turn leads to increased osteophyte formation.
The third stage of coxarthrosis is marked by pains while resting and by movement limitations in the affected hip joint. The movement limitation is on the one hand caused by the inflamed reaction of the soft tissue areas near the joint and in their shortening, and on the other hand is based in the destruction and deformation of the joint structure itself. On the basis of these deformities, axial malpositions arise, which additionally limit the usability of the affected leg. On the basis of the reduced usability of the leg, the musculature also recedes because of insufficient use, resulting in further diminished usability of the leg.
Finally, all the factors named here lead to instability of the arthritically changed hip joint, to what is called a flail joint. At the end stage of the coxarthrosis a spontaneous stiffening (ankylosis) of the joint may appear.
II. Treatment of Coxarthrosis
2.1 Conservative Therapy
From a therapeutic point of view, it is at first important to distinguish if the coxarthrosis is due to a known quality reduction of the tissue (cartilage, tendons, ligaments), or if it is due to purely mechanical factors, such as incorrect axial positioning, misshaping of the hip joint, or overloading. If the cause of the arthritic occurrence lies in purely mechanical factors, progress of the hip joint arthrosis can be prevented by removing the causes, which are not to be sought solely in the hip joint. You will find further information on this in a later issue.
In the early stage of the disease, the pains are well controllable by functional and physical therapy. This includes physical therapy with the aim of improving muscular functioning and muscular strengthening, and massages to treat the inflammation-induced tense muscle areas, and cold/heat treatment. It also makes sense to give pain-relieving and inflammation-relieving medications.
If these conservative means are exhausted – that is, the patient has pain despite the treatments, his daily mobility is limited, and he finds this situation unbearable – then an operation is indicated, in which the patient himself can decide on the timing of the implanting of the prosthesis.
2.2 Operative Therapy – “The Total Hip Arthroplasty – THA”
2.2.1 Introduction
A hip prosthesis (so-called Total Hip Arthroplasty THA) is the artificial replacement of the hip joint surfaces. In what is called a total hip endoprosthesis, the diseased acetabulum is replaced by an artificial acetabulum. The head of the femur is removed from the femoral neck and replaced by a prosthesis. Thus the diseased joint is completely removed and with it the cause of the pain. The supreme goal of prosthesis is freedom from pain and the regaining of motion in the hip joint. The materials and the operational procedures have been developed from many years of experience, though they are continually improved through intensive research and ongoing development.
The previous most common diameter of 28mm (see illustration 2) is a compromise between the wearing out of the material and adequate stability. The recent development of polyethylene resistant to rubbing has made possible a larger diameter for the head of the femur and the acetabulum with less or at least the same wear, and with the same stability and increased range of motion. In addition to the continually discussed “best type of prosthesis,” a series of other and possibly more important factors exists, which are of significance for successful long-term results.
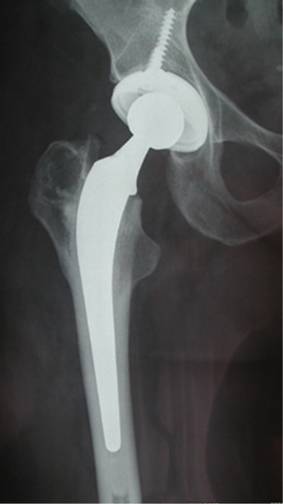
(Illustration 2): Implantation of a Tot Hip Arthroplasty (THA) with a cement-free acetabulum and a cemented shaft from the Zimmer Company.
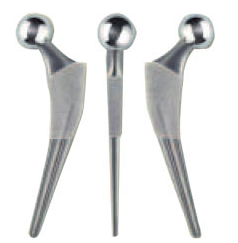
More recently the further development and improvement of the instruments and the materials led to the development of a hip prosthesis with a larger diameter of the femoral head and the acetabulum (36mm, see also illustrations 3 and 4), which is quite close to the natural hip joint. This was made possible by the development of a highly wear-resistant polyethylene.
 A
A 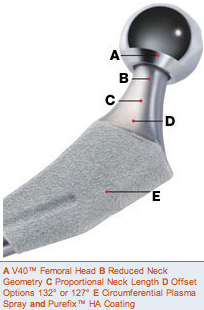 B
B 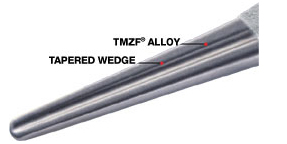 C
C
(Illustration 3): Example of a cement-free Accolade® TMZF® femoral shaft from the Stryker Company.
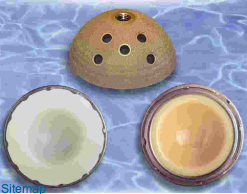
(Illustration 4): Example of a cement-free Trident Acetabular Pan (picture above, center) with a 36mm thick polyethylene inlay (picture left, bottom) and a 36mm thick ceramic pan (picture right, bottom) from the Stryker Company
The size of the femoral head diameter is a tightrope walk between the rubbing away and wear and tear of the material on the one hand and the mobility and stability of the hip joint on the other. Here it is important to know that a diameter approximating that of the natural femoral head offers better stability and greater mobility in the hip joint.
The reconstruction of the individual movement apparatus geometry with a correctly chosen prosthesis and prosthesis position, the careful handling of the soft tissue parts based on well-grounded knowledge of anatomy, and modern cementing technology in cemented prostheses are some of the most important factors for this success.
More information's on the product of the Stryker Osteonics SA are available under the website:
http://www.stryker.com/myhsp/exercise/Orthopaedics/index.htm
2.2.2 Information on the Operation
The operation can be done with full or partial anesthesia. Partial anesthesia has the advantage that the patient can observe the operation, if interested, or, for example, listen to music on headphones without feeling pain. It is also kinder to the organism, something that can play an important role in particular with elderly patients.
Since by the very nature of the disease the majority of those having a hip implant prosthesis are elderly patients, a thorough internal medicine examination by the primary care physician is indicated before the operation. Post-operative monitoring in an intensive-care unit is indicated after the operation only for patients with other internal medicine ailments.
Patients are generally hospitalized for 2-6 days. Post-operative rehabilitation measures are important; they significantly influence the course of the treatment. The goal of rehabilitation is to exercise the weakened musculature with the help of specially trained physical therapists. As soon as the day after the operation the patient is supposed to move with crutches and full weight bearing. This mobilization reduces the risk of complications, as does regular exercise, compression stockings, and blood thinning medications.
First of all, the patient learns how to get out of bed and to stand erect. Even movements of daily living, such as correct climbing of steps, are learned rather quickly. Usually patients can resume their normal lives pain-free after a few weeks. Even sports activities are allowed, though naturally extreme load bearing should be avoided during the first post-operative weeks (e.g., swimming, bicycling, cross-country skiing, gymnastics, etc.). Further information is available in section 2.2.6 Information on Physical Therapy for Knee-TP patients.
2.2.3 Minimally Invasive Implantation of a Total Hip Arthroplasty “MIS THA” Using the Stryker-Leibinger System
Minimally invasive surgery (MIS) allows the implantation of a Total Hip Arthroplasty through a small skin incision, thus allowing maximum sparing of the soft tissue. The chief aim of this new operation method is the reduction of surgical trauma with minimal damage to the bones and the soft tissue.
Thanks to this minimally invasive technique, it is possible to reduce the incision from 15-18cm to 6-8cm. This allows protection of the musculature and the ligaments. This new method of operation results in fewer post-operative pains and a faster rehabilitation.
This new operating method may also cause dangerous complications if the invasive procedure is not done by a well experienced team. The operating surgeon has only a limited view of the operation area through the small opening, and, if there is incorrect estimation of the relationships, an incorrect positioning of the prosthesis may result in a malpositioning, resulting in instability of the pan and the shaft.
The advantages of this mode of operation are not only a reduction of the post-operative pains, but also a more rapid post-operative rehabilitation and early load bearing for the hip arthroplasty. On the same day as the operation, the patient will be able to walk with full weight bearing on crutches, and he can walk with full weight bearing without crutches very soon. (See illustrations 5-9 for some examples.)
 A
A
 B
B
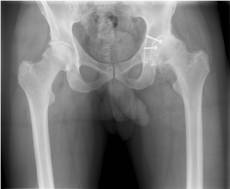
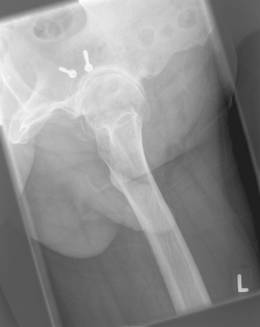
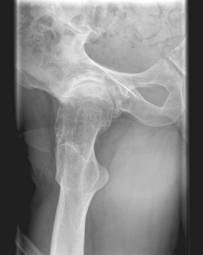
(Illustration 5): Example of a patient (Pt A) with a secondary coxarthrosis on the left due to an accident with pelvic fracture that had to be surgically operated 20 years earlier.Pre-operative X-ray images:Overview of the pelvis with patient standing (picture A) and axial picture of the left hip joint (picture B).
 A
A 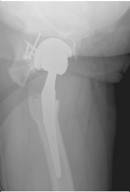 B
B
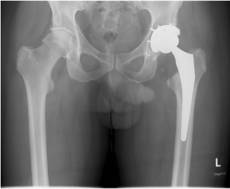
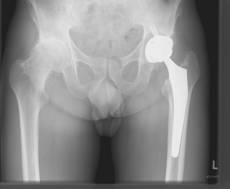
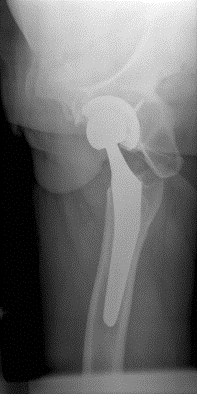
(Illustration 6): The same patient (Pt A) 2 days post-operative after implantation of a Total Hip Arthroplasty through a minimally invasive entry on the left.Post-operative X-ray images: Overview of the pelvis with patient standing (picture A) and axial picture left (picture B) after implantation of a cement-free Trident Acetabular Pan with a 36mm thick polyethylene inlay and an Accolade® TMZF® femoral shaft from the Stryker Company on the left.
 A
A
 B
B 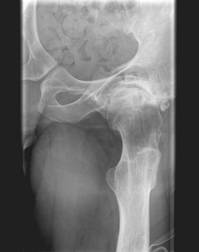 C
C
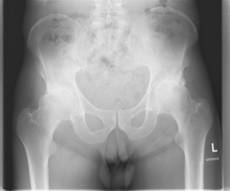
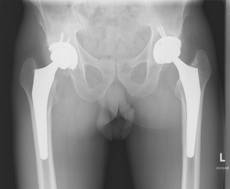
(Illustration 7): Example of a patient (Pt B) with a coxarthrosis on both sides.Pre-operative X-ray images: Overview of the pelvis with patient standing (picture A) and axial picture of the right hip joint (picture B) and of the left hip joint (picture C).
 A
A
 B
B
(Illustration 8): The same patient (Pt B) 2 days post-operative after implantation of a Total Hip Arthroplasty through a minimally invasive entry on the left. Post-operative X-ray images: Overview of the pelvis with patient standing (picture A) and axial picture left (picture B) after implantation of a cement-free Trident Acetabular Pan with a 36mm thick polyethylene inlay and an Accolade® TMZF® femoral shaft from the Stryker Company on the left.
 A
A
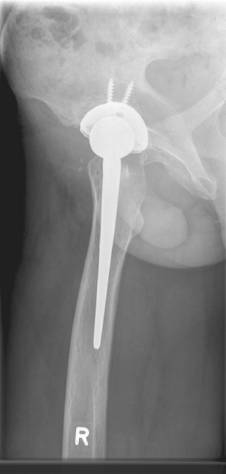 B
B
(Illustration 9): The same patient (Pt B) 2 days post-operative after implantation of a Total Hip Arthroplasty through a minimally invasive entry on the right. Post-operative X-ray images: Overview of the pelvis with patient standing (picture A) and axial picture left (picture B) after implantation of a cement-free Trident Acetabular Pan with a 36mm thick polyethylene inlay and an Accolade® TMZF® femoral shaft from the Stryker Company on the left.
2.2.4 Post-Operative Video Recording After Minimal Invasive Total Hip Arthroplasty "MIS THA"
In the following video recordings, you can see some examples after minimally invasive implantation of a Total Hip Arthroplasty “MIS THA.” Here I would like to thank again the individual patients for their kind permission.
- Patient A: 2 days after minimally invasive implantation of a Total Hip Arthroplasty (cf. illustrations 5 and 6).
Please click here
- The same patient A: 4 days after minimally invasive implantation of a Total Hip Arthroplasty on the left.
Please click here
- The same patient A: 3 weeks after minimally invasive implantation of a Total Hip Arthroplasty on the left.
Please click here
- Patient B: On the day of the operation after a minimally invasive implantation of a Total Hip Arthroplasty on the right and three months after a minimally invasive implantation of a Total Hip Arthroplasty on the left (cf. illustrations 7-9).
Please click here
- The same patient B: 4 days after minimally invasive implantation of a Total Hip Arthroplasty on the right and 3 months and 4 days after minimally invasive implantation of a Total Hip Arthroplasty on the left.
Please click here
- The same patient B: 3 months after minimally invasive implantation of a Total Hip Arthroplasty on the right and 6 months after minimally invasive implantation of a Total Hip Arthroplasty on the left.
Please click here
- Patient C: 3 weeks after minimally invasive implantation of a Total Hip Arthroplasty on the left.
Please click here
- Patient D: 4 days after minimally invasive implantation of a Total Hip Arthroplasty on the left.
Please click here
- Patient E: 3 weeks after minimally invasive implantation of a Total Hip Arthroplasty on the left.
Please click here
- Patient F: 2 days after minimally invasive implantation of a Total Hip Arthroplasty on the left.
Please click here
-The same patient F: 4 days after minimally invasive implantation of a Total Hip Arthroplasty on the left.
Please click here
- Patient G: 3 weeks after minimally invasive implantation of a Total Hip Arthroplasty on the left.
Please click here
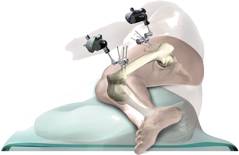
2.2.5 High Tech in the Operating Room – Minimally Invasive Computer-Supported Implantation of a Total HipArthroplasty “MIS THA ” Using the Stryker-Leibinger System
We would like to discuss the point of the correct positioning of the prosthesis in some more detail, since in Tal Hip Arthroplasty today, computer systems help the operating physician in the implantation of the prosthesis.
It is easy to imagine that in substituting a joint of the human body, the new joint must be positioned very exactly as part of a complex system of bones, ligaments, and tendons in order to avoid complications like luxations, limited movement, pains, and premature wearing out.
Till now the operator has had to turn to his experience and a few items helpful for orientation. With the help of an ever more sophisticated navigation system from the Stryker-Leibinger Company, in the future the hip prosthesis components can be positioned very exactly, just as in knee navigation. On the basis of anatomic landmarks, a picture of the hip joint and the leg of the patient is intra-operatively communicated to the computer system.
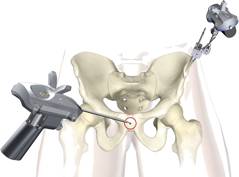
Some of the instruments for the computer-navigated minimally invasive implantation of a Total Hip Arthroplasty with the Stryker-Leibinger system.
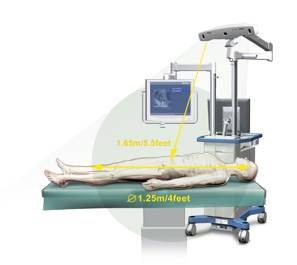
The navigation tool of the Stryker-Leibinger Company with a camera and an infra-red receiver. The device processes all the data with special algorithms and presents them on the screen for the operator.
 A
A
 B
B
 C
C
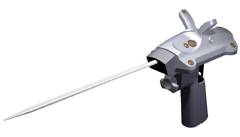
The "pointer": With this device the operating surgeon steers the navigational device from the operating table (picture A), and can digitalize the individual anatomic points (pictures B and C).
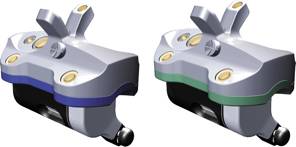
The "trackers": These communicate with the infra-red camera of the navigation system and report the 3-dimensional position of the pelvis (blue) and the leg (green).
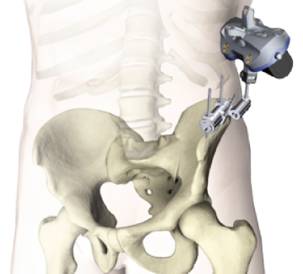
Fixation of the tracker on the pelvis with an ortholock. This determines the 3-dimensional position of the pelvis.
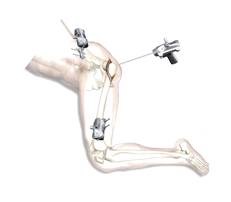
Fixation of a tracker on the pelvis (blue) and a tracker on the leg (green) in a model. Both trackers determine the 3-dimensional position of the pelvis and the leg.
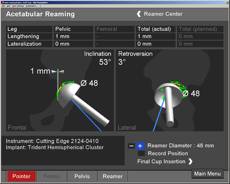
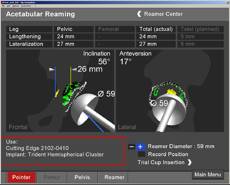
Based on these data, the load bearing axes and the best position of the prosthesis in all three planes are calculated. The operator receives these as marked data (illustration 10).
 A
A
 B
B
(Illustration 10) The surgeon can mold the position of the pan in the desired anteversion and inclination on the basis of computer data (photo A) and then definitively install it (photo B).
With the aid of these calculations, the operator can position the prosthesis exactly. It should still be noted that the operator’s experience is indispensable, since the navigation system is only a measuring instrument and an aid for the operator to orient himself better in three-dimensional space. Otherwise, the operation is done by the orthopedist like it used to be.. Another advantage is that with the orientation help of the navigation system, the operator can spare the soft tissue like the muscles and the tendons, since intra-operatively he must “expose” fewer structures to orient himself. This is an important aspect with relation to the so-called minimally invasive endoprosthetics.
In summary, the computer-aided navigation presents an efficient and economical means of implanting the prosthesis in the best possible position. An exact placement of the prosthesis avoids pains, extends the life the prostheses, and last but not least for these reasons results in significant financial savings for the healthcare system in the long term.
Above all, however, it should be noted that even though a computer-aided navigation system is a great help, it will never replace an experienced operator.
Thanks to the support of the navigation system, it is possible for the experienced operator to achieve a precise adjustment of the position of the pan and the shaft even through this small entry, and thus to have better stability for the prosthesis.
This new mode of operating requires no additional radiological or computerized tomographic preparatory examinations, and with some experience can even reduce the duration of the operation.
Hospital stays and rehabilitation periods are shorter; the life of the prosthesis is longer. This is, however, possible only if the prosthesis is installed in an anatomically perfect way. Even minimal deviations can cause chronic pain, hip luxation, and premature loosening of the prosthesis, which in turn would require an early change of prosthesis with high follow-up costs.
From these points of view, computer navigation in the future will bring about a reduction of costs for health care, but computer-assisted navigation will never replace the surgeon's experience.
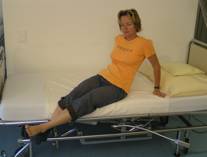
2.2.6 Information on Physical Therapy for Total Hip Arthroplasty Patients
With the following instructions, we would like to give you the opportunity to independently shape your everyday life after the operation and to improve your mobility.
You should observe these guidelines for a period of 2-3 weeks after the operation.
Here you can and downlod further information's in details concerning the physical therapy after implantation of a MIS THA
Admission Day
In the early evening you will be visited by a therapist from our physical therapy team. At that time you will be briefly questioned about the pre-history of your hip. Your hip will be tested for mobility; crutches will be adapted for you, and you will receive preliminary instructions on how to walk with the crutches and how you can climb steps.
In addition, you will be shown breathing exercises, which after the operation should lead to conscious deep breathing in order to avoid possible complications (e.g., lung infection).
Day of the Operation
After the operation we will come by and review the breathing exercises with you. You should do these at least 5 times an hour.
General
Essentially, full load bearing on the operated leg is allowed, as well all movements of daily living, as long as they are pain-free.
Body Taping
The operated leg will be body taped to the hip so that it does not swell upon sitting or getting up.
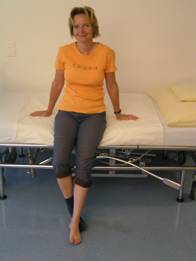
Getting Out of Bed
Support yourself on both forearms. Slide to the edge of the bed. Support the operated leg with the help of the healthy one. Turn slowly and slide forward over the edge of the bed until both feet are on the floor.


Important: On putting on your shoes, allow yourself to be helped as long as necessary. Place the foot of the operated side forward; stand up while supporting yourself with both hands on the bed. The crutches must always be within reach if needed.
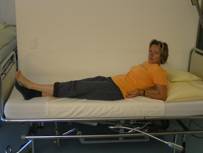
Climbing into Bed
Put the operated leg forward. Sit on the edge of the bed. Support yourself with both hands and slide backwards. Now you can raise the operated leg with the aid of the healthy one.

Getting up and Sitting Down
Place the foot of the operated side forward; support yourself with your hands, and get up. Caution: Supporting yourself on one side only presents a danger of falling over. Always support yourself with both hands until standing securely. Here too the crutches should be at hand if needed.
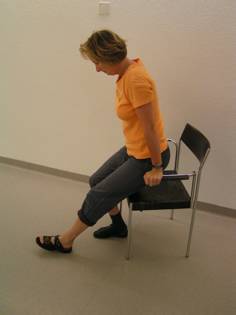
Sitting
If you get tired after long periods of sitting, you can use a wedge pillow for relief. Use higher and harder seats rather than deeper and softer ones. A toilet support can be used on the toilet if needed.
Walking with Crutches
Place the crutches forward and then position the operated leg between the crutches. Put only the amount of weight on the leg that does not cause additional pain.
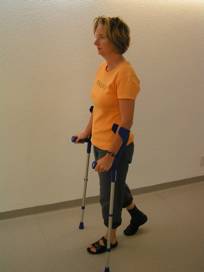
As a transition to full load bearing, put the right crutch forward with the left leg and the left crutch with the right leg.
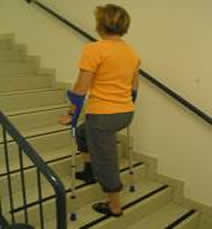
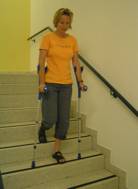
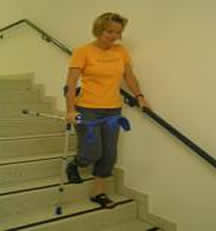
Going Up and Down Stairs with Crutches
When going up stairs, the healthy leg goes first, and the operated leg and the crutches come after.
When going down stairs, the crutches and the operated leg go together first.
When using a handrail, the order of leg and crutch remains the same.
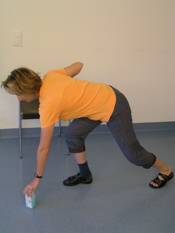
Lifting an Object from the Floor
With the help of the cane, push the object lying on the floor to a chair or piece of furniture. Support yourself with one hand on the chair or piece of furniture. Stand on the leg that was not operated on. Bend the upper body forward, and at the same time hold the operated leg with bent knee backwards.
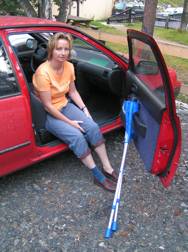
Getting In and Out of a Car (as passenger)
Push the seat, with the backrest slightly inclined, back as far as possible. Sit backwards on the seat, and bring the operated leg forward. Turn the upper body with the operated leg into the car. If necessary, lift the operated leg with your hands.
Getting Dressed
If there is no pain and enough mobility, get dressed and undressed as usual.
Otherwise, practice first with the nurse and physical therapist. Always begin getting dressed with the operated leg.
Shoes
We recommend closed shoes. The soles should be as resistant as possible to slipping (no leather soles). It is recommended to use elastic shoelaces or shoes with Velcro closing. Use a shoehorn with a long handle for putting on shoes.
Body Care
For the first 2-3 weeks after the operation, it is best to use a shower with a slip-free mat; otherwise, use the washbasin.
You can wash the operated leg using either a sponge with a long handle, or a back brush over which you should put a washcloth. To dry off, it is best to use a large terry towel.
Heat
To combat tension, for recovery, and for healing, local heat is recommended on the posterior and on the lower back area.
Sex Activity after Hip Operations
For the first 2-3 weeks after operation, sexual activity is possible within the bounds of the precautions mentioned above. Don't force anything. Your position and placement should not be painful. Above all, let your partner be active.
We will support you with many other physical therapy measures (e.g., techniques to restore muscle tone, stretches, etc.) to achieve a wound healing phase as free as possible of irritation and pain. In this sense we wish you a pleasant post-operative treatment. If there is something you don’t understand right away or if you have further questions, the physical therapist in charge will give you advice.
P.S. On our website you will find further information regarding the minimally invasive, computer navigated implantation of knee prostheses and regarding other treatments by the orthopedic-trauma-sports medicine department of the Oberengadin Hospital:
www.orthopaedie-samedan.ch
www.sportmedizin-samedan.ch
4th International Practical MIS Knee Navigation –
and MIS Hip – Training Course
11th – 13th January 2007
http://www.orthopaedie-samedan.ch/navievent.html